

Creating Your Stopfinder Account
The process begins with an email (step 1) from our transportation system. Once you sign up for bus transportation, you are entered into this system, but it is crucial that our school has an accurate email address. The email will come from the following email address: no-reply@stopfinder.com. Next, click on the blue link in the email. That will open a screen (step 2) to create a password for your account. After you create a password, click Activate My Account and you will get a screen to download the app (step 3).

Step 1

Step 2

Step 3
Download and Sign into the App
After clicking the link in step 3, your App Store will open to the Stopfinder app (step 4). After it downloads, open the app. You will immediately see a pop-up about allowing notifications. Select Allow (step 5). Then, using the password you created, along with your email, login to the app (step6).

Step 4

Step 5

Step 6
Tour and GeoAlerts Setup
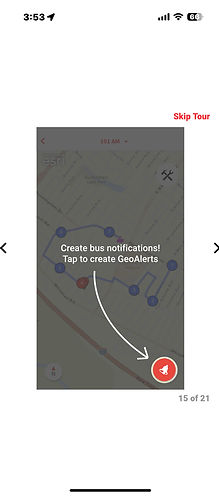
After you login after step 6, your app will open to their tour of the app (step 7). This is a very informative set of instructions that will show you how the app works and how to set up GeoAlerts. There are 21 tour steps (that number may change), but some can be ignored. Just click the arrows on the side of the screen to advance. When you see the GeoAlerts (step 8 and step 9), pay close attention.

Step 7

Step 8
Step 9
In step 10, you add a GeoAlert and name it in step 11. Step 12 shows how you can move the map to change where you want the GeoAlert. You can change the size of the GeoAlert circle with the sliding bar at the top of the menu in step 12. Change the timeframe to a window when you want to be alerted. Be sure to hit Save in the top right of the screen when you're done. You can create multiple GeoAlerts. You can contact our Transportation Director, Melisa Callahan with any questions: callahanm@apaches.k12.in.us

Step 10

Step 11

Step 12